|
Apr 23, 2024
|
Hey readers! I’m here to teach you something very important if you’re a Cricut user. It feels great when we buy ourselves a brand-new crafting machine. But, when you aren’t familiar with their connection and setup procedures, chances are that you’ll end up wasting your time in it. However, it won’t happen if you research the process well, as you did this time to learn how to connect a Cricut to a computer.
When you’re on my blog post, I will ensure that you get all the steps you need to connect your Cricut machine to your desktop. Interestingly, you can connect your Cricut to any operating system except Chromebooks. But most users rely on their computers, so I will share the steps only for them. Let’s get started with connections!
Download & Install Cricut Design Space on Your Computer
Before moving to learn how to connect a Cricut to a computer, you must learn about the Cricut app. When you’re setting up your Cricut machine, one thing that matters is whether you have the Cricut’s software installed or not. Cricut Design Space is Cricut’s special software intended for design purposes. With the use of this software, you’ll be able to design your favorite projects and cut them with your Cricut.
Step 1: Download Cricut Design Space
To get the Cricut software on your computer, you’ll have to download it by using the steps mentioned below:
Navigate to cricut.com/setup on an internet browser.

Moving forward, hit the Download button to download the app.
Now, move to the Downloads folder and double-click on the file to open it.

Thereafter, choose an option to describe your answer.
The download process for the Cricut software ends here. Let’s check how to install it.
Step 2: Install Cricut Design Space
Once you complete the Cricut app download, you need to install it on your device to use it for making designs. Let’s check the steps here.
When you open the Cricut Design Space, an installation window will appear.

Now, allow the Cricut Design app to install.
After that, use your Cricut ID and password to log in to the Cricut account.

Then, the Cricut Design Space icon will be added to your desktop.
Next, you need to right-click on your icon and select the Pin to Taskbar option.
Otherwise, you can drag the icon to your Taskbar.
Finally, you’re ready with your Cricut app.
That’s how you’ll install your Cricut software. Once you install it, you can proceed with using it to create your best designs.
How to Connect a Cricut to a Computer (Windows)?
I’m a Windows user too, so I can explain to you the process to connect your computer to Windows in an easy way. Below are the steps you need to follow in order to complete the procedure.
To start a connection, install your Cricut machine on a clean, cool, and flat surface at a distance of 10-15 feet from the PC.
Now, take your mouse to the Start menu and choose the Settings option.
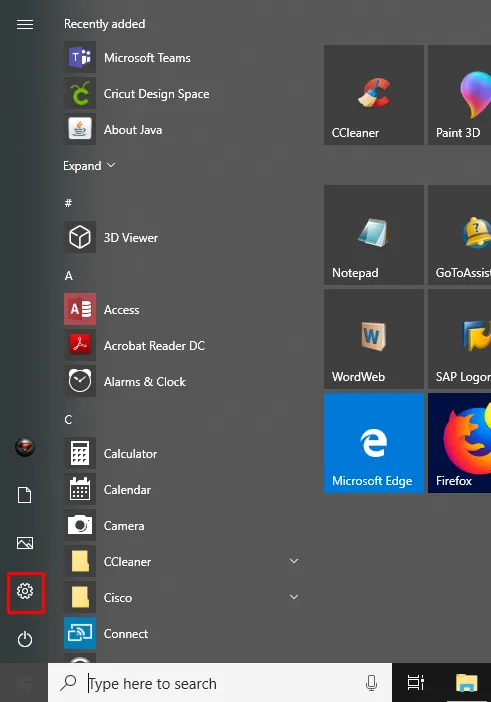
After that, click on the Devices option.
Next, verify if your Bluetooth connection is ON or not.
Then, select the Add Bluetooth or other device option.

Moving forward, hit the Bluetooth option and let your PC recognize your Cricut.
Once you see your Cricut model in the list of devices, click on the model and continue with the process.
Finally, you’ve completed the pairing process.
That’s how to connect Cricut to computer via Bluetooth. Now, you can utilize your computer and machine to create designs and cut them to make interesting projects.
How to Connect a Cricut to a Computer (Mac)?
Do you have a Mac computer? If yes, connecting it to your Cricut machine won’t be a tough task for you. So, I’ll show you some easy steps you can use to connect your Cricut to Mac.
In the beginning, verify if your computer is ON or OFF.
Now, install your Mac computer and Cricut at least 10-15 feet apart.
After that, head to the Apple menu and hit the System Preferences option.
Next, locate the Bluetooth option on the Mac computer.
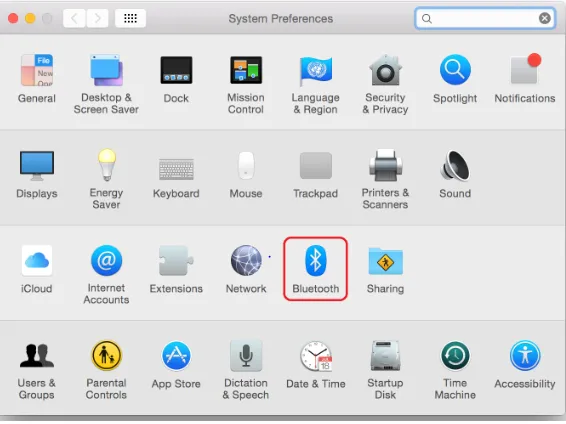
When the Bluetooth connection is ON, your computer will show the list of available devices.
Now, select your Cricut model from the list and proceed.
Finally, your Mac system will connect to your Cricut machine. Then, you’ll be ready to use your Cricut in the way you want.
Conclusion
Finally, you know how to connect a Cricut to a computer through this point to point guide. You can connect your Cricut to any device via wired or wireless connection quite easily. However, we only checked the steps for Windows and Mac computers. But, you can connect a Cricut to your mobile device too. So, don’t worry about the connections when you can connect your Cricut machine to a computer effortlessly.
FAQs
How to Install Cricut Design Space on Windows 11?
To get the Cricut Design app on Windows 11, follow these steps:
Navigate to cricut.com/setup on your internet browser.
Now, locate Cricut Design Space and hit the Download button.
After that, your app will be downloaded under the Downloads folder.
Next, move to the Downloads folder and double-click on the file to open it.
Thereafter, allow the installation to run.
Then, sign in to your Cricut ID using the right Cricut login details.
Finally, you have the Cricut software installed.
What Are the Minimum System Requirements for Mac?
When you’re going to connect your Cricut to a Mac, you need to check your Mac’s system requirements. Basically, you need a Mac OS 11 or latest version. A 4GB RAM is required with a free disk space of 2GB. Moreover, you need a resolution of 1024 x 768 px, and ports for USB and Bluetooth.
Is a Computer Necessary to Connect My Cricut?
Not at all! If you want to connect your Cricut machine to a device, it can be a mobile device, too. So, if you are connecting your Cricut to a device, it can be a computer, but not necessarily. Therefore, you can connect your Cricut to your computer as well as to your mobile.
Source URL: – How to connect a cricut to a computer